Introduction:
In my previous article, Understanding MCP – Model Context Protocol, I introduced the basics of MCP and why it is becoming an essential part of the AI developer ecosystem.
In this article, we will see how to build a simple MCP server using .NET C# and connect to it via VS Code as an MCP client. By the end of this tutorial, you will have your own MCP server project running locally and accessible through VS Code.
Prerequisites:
Before diving in, make sure you have the following installed:
- .NET 8 SDK
- Visual Studio Code
- VS Code with GitHub Co-Pilot or Claude for windows
Step 1 – Create a New .NET Console Project
Let’s start by creating a new console application for our MCP server.
Open a terminal and run:
dotnet new console -n MCP.Server
cd MCP.Server
This will create a new console app with the project name MCP.Server. You can also make a console application from Visual Studio templates.
Step 2 – Add MCP Dependencies
At the time of writing, MCP servers are implemented over stdio (standard input/output) or sockets. For this demo, we’ll stick with stdio since it’s the simplest way to integrate with VS Code.
Install the required NuGet package:
ModelContextProtocol.AspNetCoreStep 3 – Implement the MCP Server Logic
Add below code in Program.cs
using Microsoft.Extensions.DependencyInjection;
using Microsoft.Extensions.Hosting;
using Microsoft.Extensions.Logging;
using ModelContextProtocol.Server;
using System.ComponentModel;


var builder = Host.CreateApplicationBuilder(args);
builder.Logging.AddConsole(consoleLogOptions =>
{
    // Configure all logs to go to stderr
    consoleLogOptions.LogToStandardErrorThreshold = LogLevel.Trace;
});

builder.Services
    .AddMcpServer()
    .WithStdioServerTransport()
    .WithToolsFromAssembly();

await builder.Build().RunAsync();

[McpServerToolType]
public static class EchoTool
{
    [McpServerTool, Description("Echo the message back to the client")]
    public static string Echo(string message)
    {
        Console.WriteLine("Calling Echo...");
        return $"Hello from C# MCP Server: {message}";

    }
}
AddMcpServer()
This extension method registers the MCP server framework into the DI container and initializes the core MCP services.
- Sets up the infrastructure for handling requests/responses.
- Prepares the runtime so your server can expose tools and respond to MCP clients.
WithStdioServerTransport()
MCP supports different transports for communication (how the server talks to the client).
- Here, you’re choosing stdio (standard input/output).
- Your MCP server will send/receive JSON messages through stdin/stdout pipes.
- VS Code (or Claude) launches your .NET process and communicates with it over these pipes.
It’s the simplest and most widely used transport because it doesn’t require networking or sockets, just a local process.
WithToolsFromAssembly()
- MCP servers expose tools — functions or APIs that clients (like Claude in VS Code) can call.
- WithToolsFromAssembly() scans your assembly (your compiled project) for tools decorated with the [McpTool] attribute.
[McpServerToolType]
public static class EchoTool
{
    [McpServerTool, Description("Echo the message back to the client")]
    public static string Echo(string message)
    {
        Console.WriteLine("Calling Echo...");
        return $"Hello from C# MCP Server: {message}";

    }
}
[McpServerToolType]
This attribute is applied at the class level.
- This class contains tools that should be exposed to MCP clients.
- Without it, the runtime won’t scan this class for tool methods.
[McpServerTool]
This attribute is applied at the method level.
- It marks the method as a callable MCP tool.
- When the MCP client (e.g., Claude in VS Code) queries the server for tools, this method will appear in the list.
[Description(“Echo the message back to the client”)]
This is just metadata for the tool.
- It helps clients (like Claude or other MCP-aware apps) understand what the tool does.
- When the tool list is shown, the description will be visible.
Step 4: Configure VS Code as an MCP Client
Create a .vscode folder in your project root, from the Co-Pilot chat, click on the tool icon and follow the steps below
- Add MCP Server


- Select the transport protocol
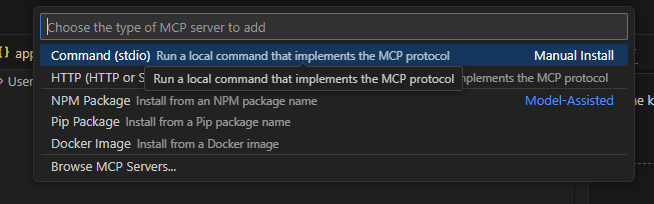
- Enter the run command

- Enter the Server name

After completing the steps, you will get the code below added to your mcp.json file.
{
"servers": {
"my-first-mcp": {
"type": "stdio",
"command": "dotnet",
"args": [
"run",
"--project",
"[Your Project path]"
]
}
},
"inputs": []
}- The transport type is stdio
- Command use dotnet
- The args is a multi-valued property, where we need to mention the project path and the command run to run the project.
You can find the tool list by click on Tools icon from the GitHub Copilot chat window

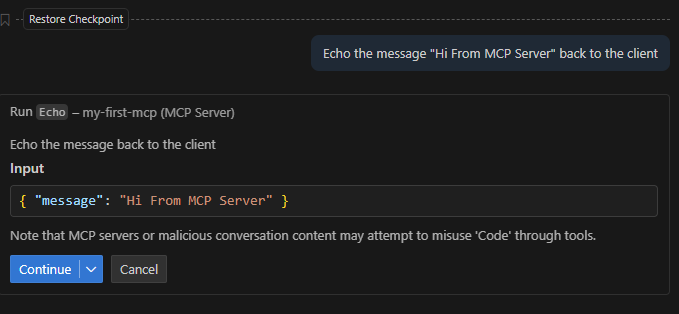
Step 5 – Verify the connection
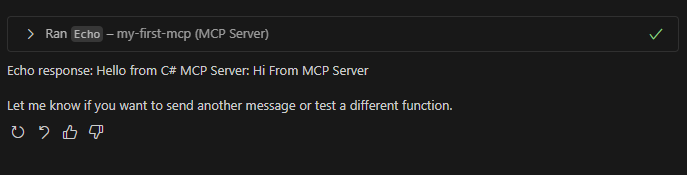
After the configuration, you can check the connection in the output window. Next, for testing, post the message “Echo the message ‘Hi From MCP Server’ back to the client” in the chat with Agent mode.
VS code as a MCP client automatically picks up the right MCP tool and generates the response.
Summary
This article explains how to build your first MCP server using .NET C# and connect it with VS Code as an MCP client. It walks through the setup in Program.cs using service registration with AddMcpServer(), WithStdioServerTransport(), and WithToolsFromAssembly(). A simple EchoTool example shows how to register and expose tools that the client can call. We will see more about MCP server security in my next article.