Introduction:
Microsoft Entra ID’s Authentication Context combined with Conditional Access Policies provides a powerful mechanism to enforce granular access control for applications and resources. By leveraging authentication context, organizations can apply step-up authentication based on specific conditions, ensuring that sensitive actions require additional verification, such as Multi-Factor Authentication (MFA), device compliance, or risk-based policies.
In this article, we will explore the Authentication Context, its role in Conditional Access policies, and how to configure it in Microsoft Entra ID to enhance security for critical applications. We will also walk through a real-world scenario demonstrating how to enforce authentication context for high-risk operations, improving security while maintaining a seamless user experience.

Enable Authentication Context in Azure Portal
To enable Authentication Context in Microsoft Entra ID and use it with Conditional Access Policies, follow these steps:
Step 1: Sign in to the Microsoft Entra Admin Center
- Open a web browser and go to Microsoft Entra Admin Center.
- Sign in with your Global Administrator or Conditional Access Administrator account.
Step 2: Navigate to Authentication Context
- In the left-hand menu, select Protection > Conditional Access.
- Click on the Authentication Contexts under Manage Blade.
- Click + New authentication context.
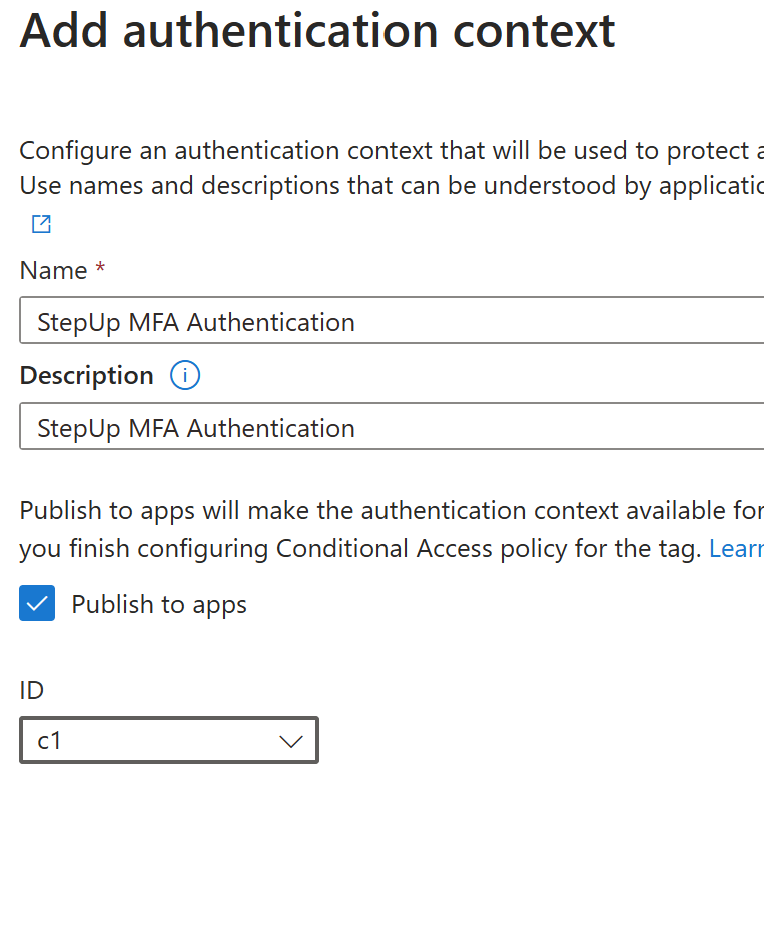
Step 3: Create an Authentication Context
- Enter a Name for the authentication context (e.g., “StepUp MFA Authentication”).
- (Optional) Provide a Description to define the purpose of the authentication context.
- Choose whether to Publish to Apps:
- Enabled: Allows applications to reference this authentication context in access policies.
- Disabled: The context remains internal to Conditional Access policies.
- Select ID – “C1”, you can create a maximum of 99 authentication contexts to the apps
- Click Create to save the authentication context.
Configure a Conditional Access Policy
Step 1: Configure a Conditional Access Policy
- In the Conditional Access section, go to Policies.
- Click + New Policy to create a new Conditional Access policy.
- Provide a Name for the policy (e.g., “CAP 001: Enforce Steup Authentication”).
Step 2: Define Policy Conditions
- Under Assignments, select Users to specify who the policy applies to.
- Under Target Resources, choose Authentication context and select the authentication context you created earlier.

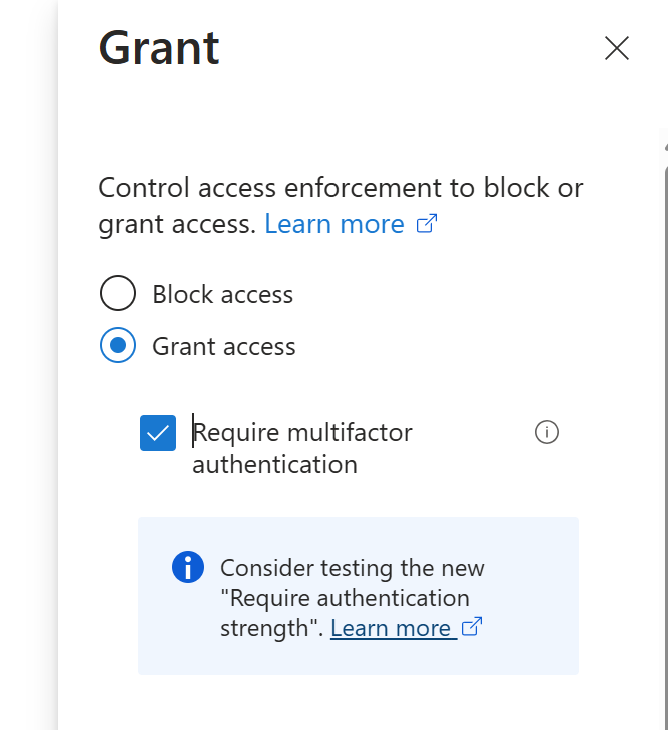
- Under Access Controls, select Grant and enable Require Multi-Factor Authentication (or any other required controls).
Step 3: Enable and Test the Policy
- Set the policy to Report-only mode initially to monitor its impact.
- Click Create to save the policy.
- After verifying that it works as expected, switch the policy to On to enforce it.
Testing the policy with a Web Application
Step 1: Register the Entra ID application and configure the Identity for the .NET Core web application
Click here to check how to create the web application with Microsoft Entra ID integration
Assume a scenario where I have an admin page in my application that contains sensitive information that should be accessible only to certain users. In our case, this page should be accessible only to the user (shaaniyag) with a setup authentication (Require MFA) to access it based on the conditional access policy configured in previous steps.
Step 2: Create the following function in your application
        public string CheckForRequiredAuthContext(string authContext)
        {
            string claimsChallenge = string.Empty;

            string savedAuthContextId = authContext;

            if (!string.IsNullOrEmpty(savedAuthContextId))
            {
                HttpContext context = this.HttpContext;

                string authenticationContextClassReferencesClaim = "acrs";

                if (context == null || context.User == null || context.User.Claims == null || !context.User.Claims.Any())
                {
                    throw new ArgumentNullException("No Usercontext is available to pick claims from");
                }

                Claim acrsClaim = context.User.FindAll(authenticationContextClassReferencesClaim).FirstOrDefault(x => x.Value == savedAuthContextId);

                if (acrsClaim?.Value != savedAuthContextId)
                {
                    claimsChallenge = "{\"id_token\":{\"acrs\":{\"essential\":true,\"value\":\"" + savedAuthContextId + "\"}}}";

                }
            }

            return claimsChallenge;
        }
The above function will check the user claim “acrs” with the value “C1” exists or not, if it doesn’t exist it creates a claims payload to be sent back to Entra ID.
I have used the below code block to check the user has acrs claims with the value “C1” with the function CheckForRequiredAuthContext, if it doesn’t challenge user to receive the acrs claims with the claim payload returned by CheckForRequiredAuthContext function.
    public IActionResult Admin()
    {
        string claimsChallange = CheckForRequiredAuthContext("C1");
        if (!string.IsNullOrEmpty(claimsChallange))
        {
            _consentHandler.ChallengeUser(new string[] { "user.read" }, claimsChallange);
            return new EmptyResult();
        }
        return View();
    }
Run the program when the user tries to access the admin page of the application, the conditional access policy with authentication context will trigger and enforce the user to complete the MFA. If the user went through the MFA process early, it will pass through.
Summary:
This article provides a step-by-step guide on enabling Authentication Context in Microsoft Entra ID and integrating it with Conditional Access Policies to enforce granular security controls. It explains how Authentication Context helps organizations implement step-up authentication for high-risk actions by requiring Multi-Factor Authentication (MFA) or other access conditions.
Source code – GitHub
Reference:

Leave a Reply