Introduction:
In a standard Azure AD B2C password reset flow, when a user clicks “Forgot your password?” they are presented with an email verification screen. The user enters their email address and clicks “Send verification code.” At this point, the system generates a one-time password and sends it to the provided email address. The user then enters the verification code, and upon successful verification, they are allowed to set a new password.
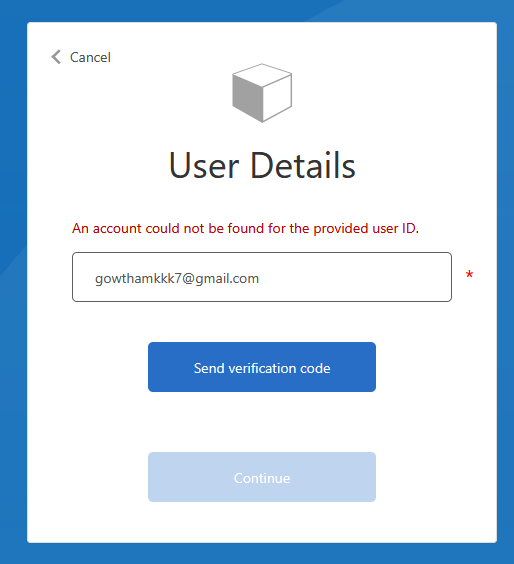
The problem with this default behavior is that the verification code is sent regardless of whether the email address is actually registered in the directory. This means that if a user enters an email address that does not have an associated account, the system still sends a verification code. The user goes through the entire verification process only to encounter an error at a later stage when the system tries to read the user account from the directory and fails.
A better approach is to validate the email address against the Azure AD B2C directory before sending the verification code. If the email address is not registered, the user is immediately informed with a clear error message such as “An account could not be found for the provided email address.” This saves time, reduces confusion, and prevents unnecessary verification code generation.
How the Validation Works?
The validation is achieved by introducing a pre-check step within the Display Control that handles email verification in the password reset flow. This pre-check queries the Azure AD B2C directory to determine whether a user account exists for the given email address before any verification code is generated or sent.
The Display Control used for password reset email verification defines a set of actions. The most important action for our purposes is the “SendCode” action, which is triggered when the user clicks the “Send verification code” button. Within this action, you can chain multiple validation technical profiles that execute sequentially. The key insight is that if any validation technical profile in the chain fails, the subsequent ones do not execute, and the error is displayed to the user immediately.
By placing a directory lookup technical profile as the first validation step in the SendCode action, you ensure that the system checks for the existence of the email address before proceeding to generate and send the verification code.
Step by Step Instructions for Applying the Validation:
Step 1: Create the Directory Lookup Technical Profile
You need to create a technical profile that reads from the Azure AD B2C directory using the user’s email address. This technical profile should be configured to raise an error if no user account is found matching the provided email address.
The technical profile uses the Azure Active Directory claims provider and performs a Read operation. The critical configuration is the metadata item “RaiseErrorIfClaimsPrincipalDoesNotExist” which must be set to “true”. This tells Azure AD B2C to throw an error if no matching account is found in the directory.
You should also set the “UserMessageIfClaimsPrincipalDoesNotExist” metadata item to a user-friendly message that will be displayed when the account is not found. A suitable message would be something like “An account could not be found for the provided email address.”
The input claim for this technical profile should map the email claim to the “signInNames.emailAddress” partner claim type, as this is how Azure AD B2C stores local account email addresses in the directory.
Set “IncludeInSso” to false to ensure this check is performed every time and is not bypassed by single sign-on session caching.
The technical profile should include the AAD-Common technical profile to inherit the common Azure Active Directory provider configuration.
<ClaimsProvider>
    <DisplayName>Azure Active Directory</DisplayName>
    <TechnicalProfiles>
        <TechnicalProfile Id="AAD-UserReadUsingEmailAddress-RaiseIfNotExists">
            <Metadata>
                <Item Key="Operation">Read</Item>
                <Item Key="RaiseErrorIfClaimsPrincipalDoesNotExist">true</Item>
                <Item Key="UserMessageIfClaimsPrincipalDoesNotExist">An account could not be found for the provided email address.</Item>
            </Metadata>
            <IncludeInSso>false</IncludeInSso>
            <InputClaims>
                <InputClaim ClaimTypeReferenceId="email" PartnerClaimType="signInNames.emailAddress" Required="true" />
            </InputClaims>
            <OutputClaims />
            <IncludeTechnicalProfile ReferenceId="AAD-Common" />
        </TechnicalProfile>
    </TechnicalProfiles>
</ClaimsProvider>
Check the extension file changes here
Step 2: Create the Password Reset Display Control
<DisplayControl Id="passwordResetVerificationControl" UserInterfaceControlType="VerificationControl">
    <DisplayClaims>
        <DisplayClaim ClaimTypeReferenceId="email" Required="true" />
        <DisplayClaim ClaimTypeReferenceId="verificationCode" ControlClaimType="VerificationCode" Required="true" />
    </DisplayClaims>
    <OutputClaims>
        <OutputClaim ClaimTypeReferenceId="email" />
    </OutputClaims>
    <Actions>
        <!-- Actions are configured in Step 3 and Step 4 -->
    </Actions>
</DisplayControl>
Create a Display Control of type “VerificationControl” specifically for the password reset flow. This Display Control will manage the email verification user interface, including the email input field, the send verification code button, the verification code input field, and the verify button.
The Display Control should have two Display Claims: one for the email address and one for the verification code. The verification code claim should have its ControlClaimType set to “VerificationCode” so that the Display Control recognizes it as the code input field.
The Output Claims section should include the email claim so that the verified email address is passed forward in the user journey.
Step 3: Configure the SendCode Action with Pre-Validation
<Action Id="SendCode">
    <ValidationClaimsExchange>
        <ValidationClaimsExchangeTechnicalProfile TechnicalProfileReferenceId="AAD-UserReadUsingEmailAddress-RaiseIfNotExists" ContinueOnError="false" />
        <ValidationClaimsExchangeTechnicalProfile TechnicalProfileReferenceId="AadSspr-SendCode" />
    </ValidationClaimsExchange>
</Action>
This is the most important step. Within the Display Control’s SendCode action, you define the ValidationClaimsExchange section. This section contains the list of validation technical profiles that execute in sequence when the user clicks “Send verification code.”
Place the directory lookup technical profile you created in Step 1 as the first validation technical profile in the chain. Set its ContinueOnError attribute to “false”. This ensures that if the email address is not found in the directory, the chain stops immediately and an error message is displayed to the user. No verification code is generated, and no email is sent.
After the directory lookup, add the technical profiles that handle the actual verification code sending. These could be either the Azure AD SSPR protocol provider or a custom one-time password generation and email sending combination, depending on your implementation choice.
The execution order is strictly sequential. First, the directory lookup checks if the account exists. Only if the account is found does the flow proceed to generate and send the verification code.
Step 4: Configure the VerifyCode Action
The VerifyCode action handles the verification of the code entered by the user. This action should contain the technical profile that validates the one-time password or SSPR code. No changes are needed here for the email validation feature, as by the time the user reaches the code verification stage, we already know their account exists.
<Action Id="VerifyCode">
    <ValidationClaimsExchange>
        <ValidationClaimsExchangeTechnicalProfile TechnicalProfileReferenceId="AadSspr-VerifyCode" />
    </ValidationClaimsExchange>
</Action>
Step 5: Update the Password Reset Technical Profile
The self-asserted technical profile that renders the password reset page needs to reference the new Display Control. In the DisplayClaims section of the password reset technical profile, replace any existing email verification claim with a DisplayClaim that references your new Display Control using the DisplayControlReferenceId attribute.
Ensure that the EnforceEmailVerification metadata is set to “false” in this technical profile, since the email verification is now handled by the Display Control rather than the built-in mechanism.
<TechnicalProfile Id="LocalAccountDiscoveryUsingEmailAddress">
    <DisplayName>Reset password using email address</DisplayName>
    <Protocol Name="Proprietary" Handler="Web.TPEngine.Providers.SelfAssertedAttributeProvider, Web.TPEngine, Version=1.0.0.0, Culture=neutral, PublicKeyToken=null" />
    <Metadata>
        <Item Key="IpAddressClaimReferenceId">IpAddress</Item>
        <Item Key="ContentDefinitionReferenceId">api.localaccountpasswordreset</Item>
        <Item Key="UserMessageIfClaimsPrincipalDoesNotExist">An account could not be found for the provided email address.</Item>
        <Item Key="EnforceEmailVerification">false</Item>
    </Metadata>
    <CryptographicKeys>
        <Key Id="issuer_secret" StorageReferenceId="B2C_1A_TokenSigningKeyContainer" />
    </CryptographicKeys>
    <IncludeInSso>false</IncludeInSso>
    <DisplayClaims>
        <DisplayClaim DisplayControlReferenceId="passwordResetVerificationControl" />
    </DisplayClaims>
    <OutputClaims>
        <OutputClaim ClaimTypeReferenceId="objectId" />
        <OutputClaim ClaimTypeReferenceId="userPrincipalName" />
        <OutputClaim ClaimTypeReferenceId="authenticationSource" />
    </OutputClaims>
    <ValidationTechnicalProfiles>
        <ValidationTechnicalProfile ReferenceId="AAD-UserReadUsingEmailAddress" />
    </ValidationTechnicalProfiles>
</TechnicalProfile>
Step 6: Test the Flow
After deploying the updated policies, test the password reset flow with both scenarios. First, enter an email address that is registered in the directory and confirm that the verification code is sent successfully. Second, enter an email address that is not registered and confirm that the error message “An account could not be found for the provided email address” appears immediately without any verification code being sent.
Summary:
By adding a directory lookup as a pre-validation step in the password reset Display Control’s SendCode action, you create a more efficient and user-friendly password reset experience. The validation queries the Azure AD B2C directory to check whether the provided email address belongs to an existing account before any verification code is generated or sent. If the account does not exist, the user is immediately informed with a clear error message, saving them the time and confusion of going through a full email verification process only to be told at a later stage that their account was not found. This approach reduces unnecessary resource consumption, improves the overall user experience, and provides immediate feedback to the user at the earliest possible point in the password reset flow.
Check my repo for the complete source code