Introduction:
In modern cloud-native applications, managing credentials and secrets has always been a significant security challenge. Traditional approaches require storing client secrets in configuration files, which poses security risks even when using secret management systems. Microsoft Azure’s Managed Identity feature revolutionizes this approach by eliminating the need for credentials entirely.
This article demonstrates how to build a Blazor Server application that leverages Azure Managed Identity to securely access the Microsoft Graph API. We’ll explore why Managed Identity is the preferred approach for Azure workloads and provide a complete implementation guide.
What is Managed Identity?
Managed Identity is a Microsoft Entra ID (formerly known as Azure Active Directory) feature that provides Azure services with an automatically managed identity. This identity can be used to authenticate to any service that supports Azure AD authentication, including Microsoft Graph API, without storing credentials in your code.
Types of Managed Identities
- System-Assigned Managed Identity
- Lifecycle tied to the Azure resource
- Automatically created and deleted with the resource
- One identity per resource
- Perfect for single-service scenarios
- User-Assigned Managed Identity
- Independent lifecycle
- Can be shared across multiple resources
- Managed separately from Azure resources
- Ideal for multi-service architecture
Benefits of Managed Identity
- No Credential Management – No secrets to store, rotate, or secure
- Automatic Credential Rotation – Azure handles token lifecycle
- Reduced Attack Surface – No credentials to leak or compromise
- Simplified Development – No complex authentication code
- Compliance & Audit – Built-in Azure AD security features
- Cost-Effective – No additional licensing required
Application Permissions vs. Delegated Permissions
Understanding the difference between these permission types is crucial for implementing Managed Identity correctly.
Delegated Permissions (User Context)
- Require a signed-in user
- App acts on behalf of the user
- Limited by the user’s permissions
- Requires interactive sign-in
- Example: User reads their own profile
Application Permissions (App Context)
- No user required – app acts on its own behalf
- App has its own identity and permissions
- Can access tenant-wide data
- Works with service principals and Managed Identities
- Example: Background service reading all groups
Use Case: Daemon services, background jobs, serverless functions
Why Managed Identity Requires Application Permissions? Managed Identity operates in an app-only context without a signed-in user. Therefore, it cannot use delegated permissions.
When your Azure App Service uses Managed Identity to call Microsoft Graph?
- There is no interactive user session
- The Managed Identity itself is the service principal
- Only application-level permissions work
- Permissions must be granted to the service principal, not the app registration
This is why you must:
- Grant application permissions to the Managed Identity’s service principal
- Use the `.default` scope in your token requests
- Have admin consent for application permissions
For demo purposes, I built a Blazor server application that implements a dual-mode authentication strategy:
Local Development:
- Users sign in through browser (OpenID Connect)
- Uses delegated permissions
- Accesses Graph API with the user’s token
- Perfect for development and testing
Azure Production:
- Users sign in for authentication only
- Managed Identity used for Graph API calls
- Uses application permissions
- No secrets stored anywhere
This approach provides the best of both worlds: easy local testing with familiar sign-in flow, and secure production deployment with Managed Identity.
Step 1: Create the Blazor Server Application
1.1 Create New Project
Create a new Blazor Server project using Visual Studio or using the command below
dotnet new blazorserver -n MS_Entra_ID_Blazor_Server1.2 Install Required NuGet Packages
- dotnet add package Microsoft.Identity.Web
- dotnet add package Microsoft.Identity.Web.UI
- dotnet add package Microsoft.Identity.Web.MicrosoftGraph
- dotnet add package Microsoft.AspNetCore.Authentication.OpenIdConnect
- dotnet add package Microsoft.Graph
- dotnet add package Azure.Identity
Step 2: Register Application in Microsoft Entra ID
2.1 Create App Registration
- 1. Sign in to Microsoft Admin Center
- 2. Click New registration
- 3. Configure:
- Name: `BlazorServerManagedIdentity`
- Supported account types: Single tenant
- Redirect URI:
- Platform: Web
- URI: `https://localhost:<you port number>/signin-oidc` (for local testing)
- 4. Click Register
2.2 Note Important IDs
- Application (client) ID
- Directory (tenant) ID
- Domain (e.g., yourtenant.onmicrosoft.com)
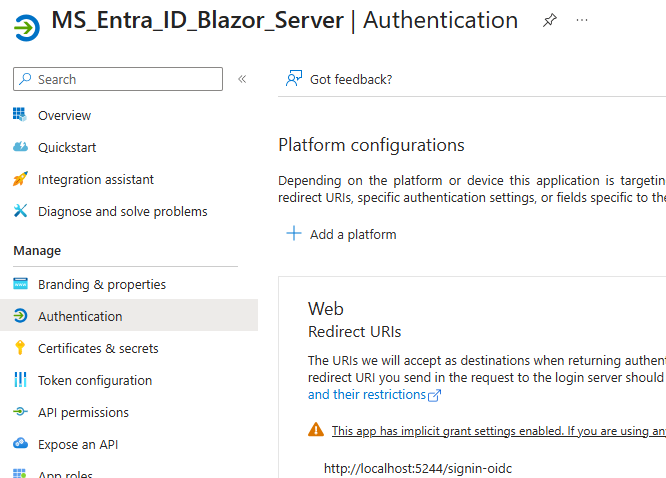
2.3 Configure Authentication
- Go to Authentication -> Settings
- Under Implicit grant and hybrid flows, check:
- ID tokens (used for user sign-in)
- Click Save
We are NOT creating a client secret because we’ll use Managed Identity in production.
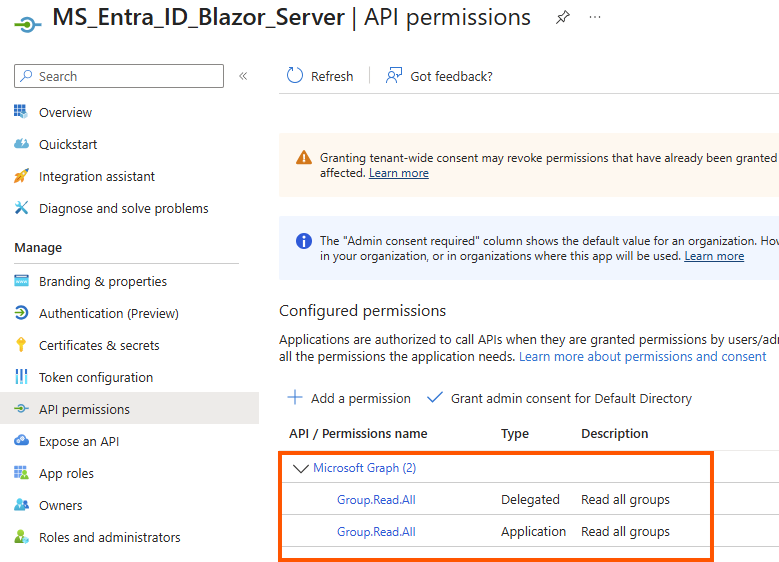
2.4 Add API Permissions
- Go to API permissions
- Click Add a permission → Microsoft Graph → Delegated permissions, and Application permission
- Add:
- `Group.Read.All`
- `User.Read`
- Click Grant admin consent for your tenant
Step 3: Configure Application Settings
  "AzureAd": {
    "Instance": "https://login.microsoftonline.com/",
    "Domain": "yourtenant.onmicrosoft.com",
    "TenantId": "YOUR-TENANT-ID",
    "ClientId": "YOUR-CLIENT-ID",
    "CallbackPath": "/signin-oidc"
  },
  "MicrosoftGraph": {
    "BaseUrl": "https://graph.microsoft.com/v1.0",
    "Scopes": "Group.Read.All"
  },
Replace:
- YOUR-TENANT-ID with your Directory (tenant) ID
- YOUR-CLIENT-ID with your Application (client) ID
- yourtenant.onmicrosoft.com with your domain
Step 4: Implement Managed Identity Graph Service
4.1 Create Services Folder and Service Class
Create `Services/ManagedIdentityGraphService.cs`, get the code from GitHub
Key Points:
- Two constructors handle different authentication scenarios
- `DefaultAzureCredential` automatically detects Managed Identity in Azure
- `.default` scope works for both delegated and application permissions
- Pagination support for tenants with many groups
Step 5: Configure Program.cs
Update Program.cs with environment-specific configuration, get the code from GitHub
EntraID-Apps/MS_Entra_ID_Blazor_Server/Program.cs at master · gowthamece/EntraID-Apps
- Environment detection using `WEBSITE_INSTANCE_ID` (only exists in Azure)
- Different authentication pipelines for local vs. Azure
- Service registration resolves constructor ambiguity
Step 6: Create Groups Display Page
Get the code from GitHub
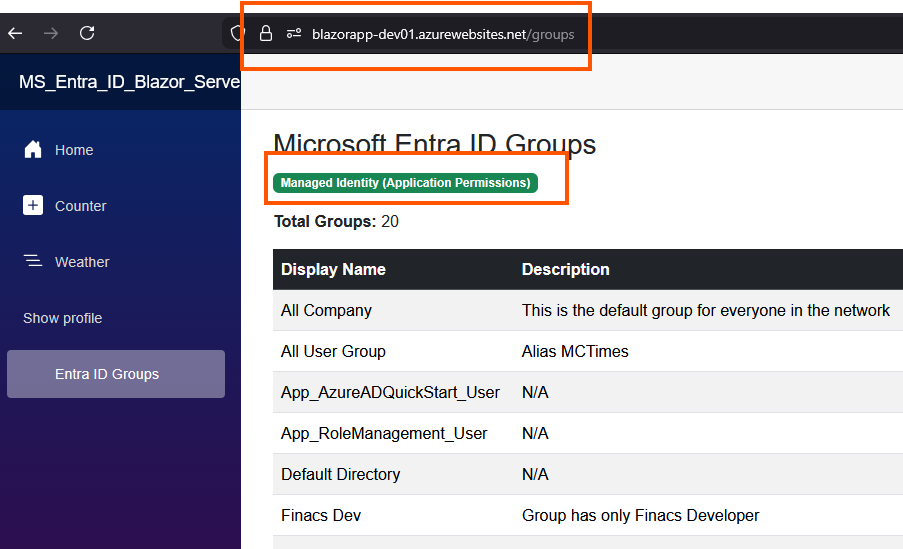
- Visual indicator showing authentication method
- List the available Groups in local with delegated permission, and list out all groups with App permission
Step 7: Create Azure App Service
Navigate to the Azure portal and create an Azure App Service for a deployment
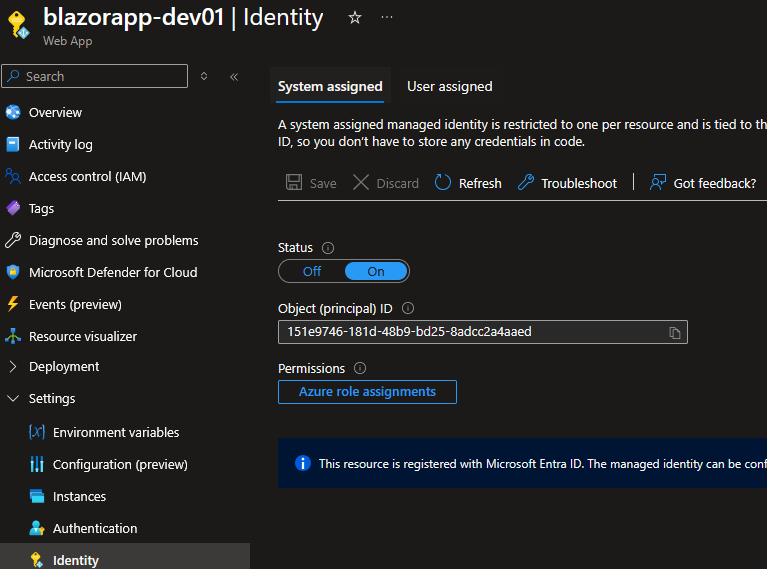
Step 8: Enable Managed Identity
- Navigate to your Web App
- Go to Settings → Identity
- Under System assigned tab:
- – Toggle Status to On
- – Click Save
- Copy the Object (principal) ID – you’ll need this!
Step 9: Grant Graph API Permissions to Managed Identity
This is the most critical step. The Managed Identity’s service principal needs application permissions to access Microsoft Graph.
9.1 PowerShell Script (Recommended)
Get the code from my GitHub repository
9.2 Run the PowerShell Script
Replace with your Tenant ID and the webAppName (It should be your Azure Web App)
Without this permission assignment, Managed Identity cannot access Graph API
Why don’t delegated permissions work?
- Managed Identity has no user context
- Cannot consent to delegated permissions
- Only application permissions are supported
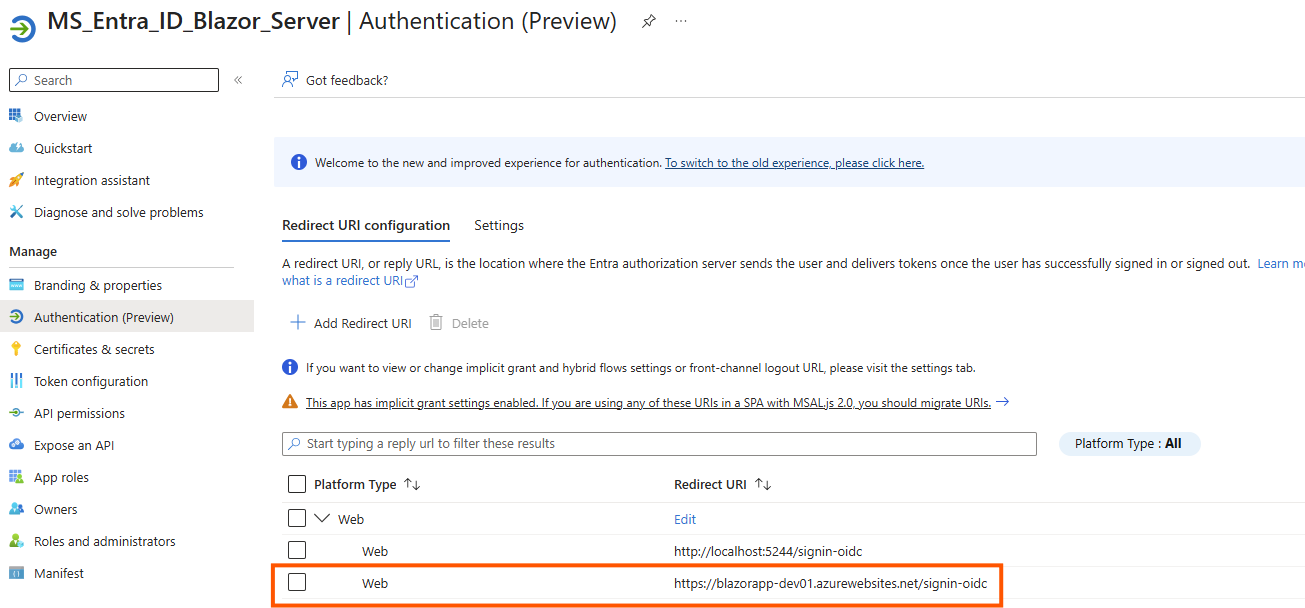
Step 10: Update App Registration for Azure
Add the new Azure web app URL to the Entra ID App redirect URI
Step 11: Deploy Application
Deploy the application using Visual Studio or Azure CLI
Browse the application, in production (Azure web app) it uses Managed Identity
In local, it uses delegated permission to retrieve the group information
Summary
Implementing Microsoft Graph API with Managed Identity provides a secure, scalable, and maintainable solution for Azure workloads. By eliminating secrets and leveraging Azure’s native authentication, we achieve:
- Enhanced Security- No credentials to compromise
- Simplified Operations – No secret rotation or management
- Better Compliance – Built-in auditing and Azure AD integration
- Cost Efficiency – No additional secret management infrastructure
- Developer Productivity – Clean code without complex auth logic

Leave a Reply